Jeanette Jewel - » Jeanette Jewel <3
  • Home
  • Food + drinks
    • Sweet // Sødt
    • Savory // Salt
  • My life
  • Shopping
  • Travelling
  • Photography
Home
Food + drinks
    Sweet // Sødt
    Savory // Salt
My life
Shopping
Travelling
Photography
Jeanette Jewel - » Jeanette Jewel <3
  • Home
  • Food + drinks
    • Sweet // Sødt
    • Savory // Salt
  • My life
  • Shopping
  • Travelling
  • Photography
Food + drinks•Sweet // Sødt

Galaxy Chocolates

08/03/2017 by Jeanette Jewel No Comments
Making filled chocolates it so much more than just pouring chocolate into molds and filling them, after I heard about coloured cocoa butter that can actually colour your chocolates and make them into the prettiest little artworks. This also meant playing around with chocolates and colouring recently, where I ended up making these gorgeous little galaxy chocolates filled with marzipan and nougat crunch (The nougat crunch recipe is HERE). I’m so happy with the outcome and now I’m gonna let you know how I did it! 

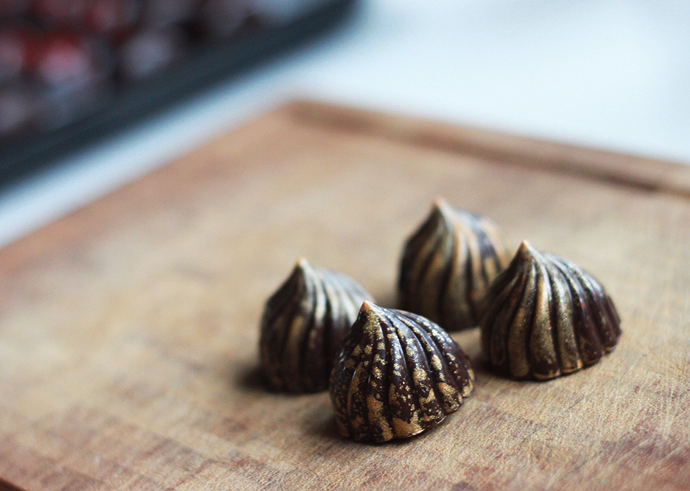
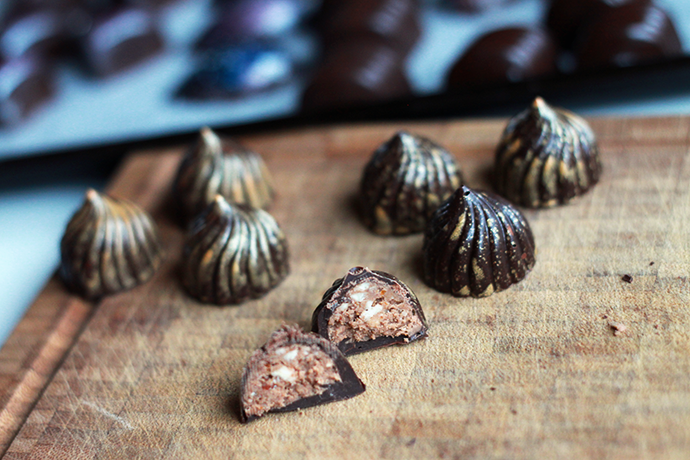
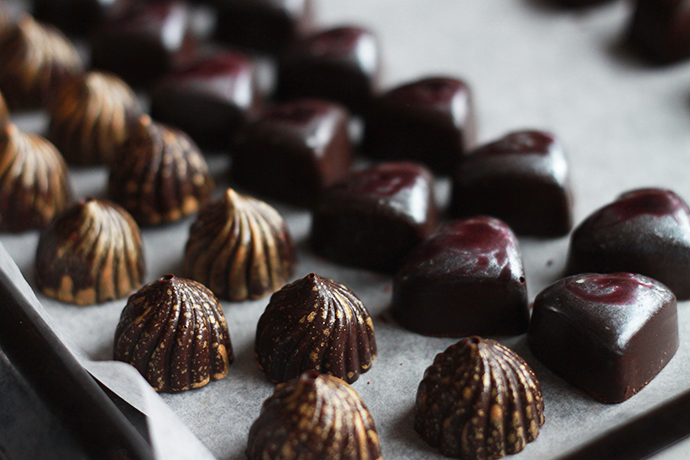
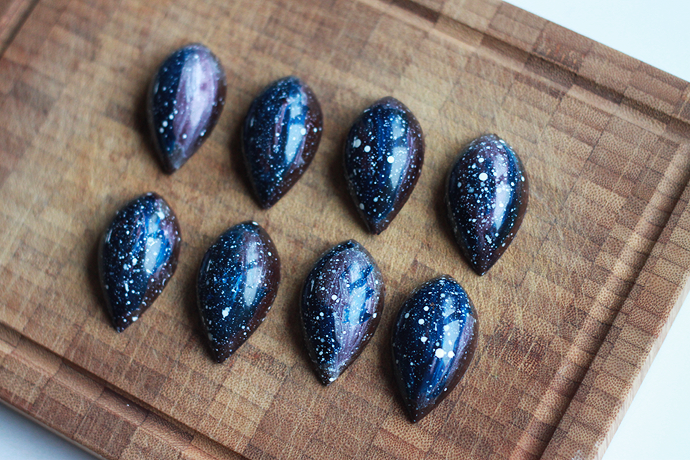
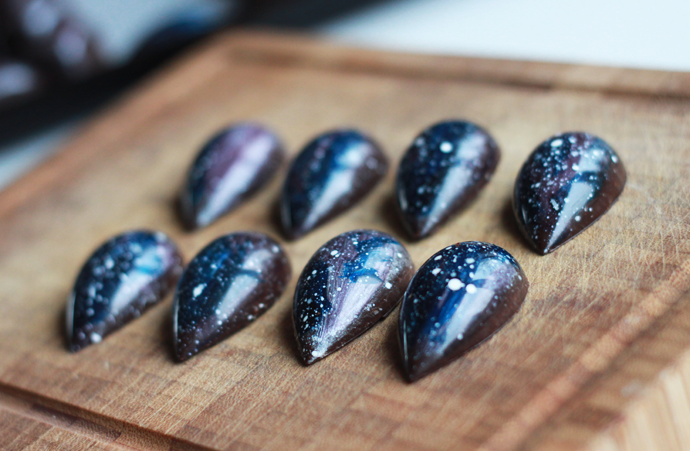
Det at lave fyldte chokolader er så meget mere end bare at fylde chokolade i forme og så fylde dem, efter at jeg hørte om farvet kakaosmør der kan farve ens chokolader og gøre dem til de fineste små kunstværker. Det betød også at jeg for nylig gav mig i kast med at lege lidt med chokolader og farver og jeg endte så med at lave disse fine galakse chokolader fyldt med marcipan og nougat crunch (Opskriften på nougat crunch kan findes HER). Jeg er så tilfreds med resultatet og vil nu også fortælle jer, hvordan jeg har gjort det! 

RECIPE/OPSKRIFT:
– 200g dark chocolate chips/Mørk chokolade, knapper
– Filling/Fyld
– Coloured cocoa butter in cold tones (Buy HERE)/Chokoladefarve i kolde toner (Køb HER)
– Pearl White dust/Perlemors støv
– Drop chocolate mold (Buy HERE)/Dråbe chokoladeform (Køb HER)

– Sugar thermometer/Sukker termometer (Vi brugte denne spatula med indbygget termometer)
– Brushes/Pensler

1. Firstly, splatter white cocoa butter into the drop mold. Let it set and then splatter some silver cocoa butter. Nextly, paint in blue and purple cocoa butter on top of the splattered and lastly use some pearl dust to give it shine. // Start med at “splatte” hvid chokoladefarve i formen. Lad det tørre og splat dernæst sølv i. Lad det tørre og mal lilla og blå ovenpå. 
2. Melt two thirds of the chocolate chips in a water bath until it hits 48 degrees celcius. Pour the melted chocolate over the last third and when the chocolate hits 32 degrees celcius, it’s ready to use. // Smelt to tredjedele af chokoladeknapperne over vandbad indtil det rammer 48 grader. Hæld det dernæst over den sidste tredjedel, indtil det rammer 32 grader og er klar til at bruges. 
3. Fill the chocolate mold with dark chocolate and then turn it upside down to make sure there’s only a shell of chocolate left in the molds. Scrape the mold from excess chocolate. Let the chocolates cool in the fridge, upside down, for about 10 minutes. // Fyld dernæst formen med mørk chokolade og vend den på hovedet over en skål, for at sikre at alt overskydende chokolade kommer ud og der kun er en skal i formen. Skrab formen godt. Lad det dernæst køle i køleskabet i 10 minutter. 
4. Add your favorite fillings to the chocolates and put into the fridge for another 10 minutes. // Put dit yndlings fyld i chokoladerne og kom dem dernæst i køleskabet i endnu 10 minutter. 
5. Add the 32 degree celcius chocolate on the mold to close the chocolates (I use THIS chocolate melter to keep my chocolate tempered). Put in the freezer for about 10 minutes. // Kom tempereret chokolade på som bund (Jeg bruger DENNE chokoladesmelter til at holde min chokolade tempereret). Kom i fryseren i cirka 10 minutter. 
6. Pop your delicious little chocolates out of the mold and enjoy! // Så er dine chokolader klar til at komme ud af formen og nydes! 

Share:
Food + drinks•Sweet // Sødt

Chocolate Chip Cheesecake Bars

22/02/2017 by Jeanette Jewel No Comments
A few weeks back I saw this combination of chocolate chip cookies and cheesecake in a video on Facebook and immediately thought to myself, that I had to try this recipe out – and I’m really glad I did! I served these to my family and they all loved them. Especially my mother said (a lot of times, actually) that it is definitely one of the best cakes she ever had and that she had to have the recipe. So, this one is for you, mom – and of course everybody else who wants to taste this amazing combination! 

For et par uger siden så jeg kombinationen af cookies og cheesecake i en video på Facebook og med det samme tænkte jeg, at det var noget jeg simpelthen var nødt til at prøve – og jeg er virkelig glad for, at jeg valgte at gøre dét! Jeg serverede disse lækre barer for min familie og de var alle helt vilde med dem. Især min mor sagde (en del gange, faktisk) at det var “verdens bedste kage” og at hun var nødt til at få opskriften. Så værsgo’, mor – og selvfølgelig alle jer der ellers gerne vil prøve at bage denne lækre kombination af cookie og cheesecake! 


RECIPE/OPSKRIFT (15x25cm):

Cookie: 
– 250g flour/mel
– ½ tsp baking soda/tsk natron
– ½ tsp salt/tsk salt
– 150g soft butter/blødt smør
– 125g brown sugar/brun farin
– 1 egg/æg
– 125g sugar/sukker
– 2 tsp vanilla/tsk vanille essens
– 175g dark chocolate chips/hakket mørk chokolade

Cheesecake:
– 230g cream cheese/flødeost
– 125g sugar/sukker
– 1 egg/æg
– 2 tsp vanilla/tsk vanille essens

1. Mix soft butter, brown sugar and sugar until combined. Add the egg and the vanilla and mix well once again. // Bland det bløde smør, brun farin og sukker indtil det er godt blandet. Tilføj ægget og vanillen og pisk det godt sammen endnu engang. 
2. Add flour, baking soda and salt and mix once again, until a solid cookie dough. // Tilføj mel, natron og salt og pisk godt igen, indtil det bliver en solid cookie-dej. 
3. Add the chocolate chips to the dough. // Tilføj den mørke chokolade i dejen. 
4. In another bowl, add cream cheese, sugar, vanilla and an egg. Mix well. // Kom flødeost, sukker, vanille and et æg i en anden skål og pisk det godt sammen. 
5. Spread out 2/3 of the cookie dough into a greased or lined baking tin. Then add the cheesecake filling and sprinkle the rest of the cookie dough on top of that. Bake for 45-55 minutes at 180 degrees celcius. // Kom 2/3 af cookie-dejen i en form med bagepapir i og spred den godt ud. Tilføj dernæst cheesecake-fyldet og drys så det resterende af cookie-dejen ovenpå. Bag kagen i 45-55 minutter på 180 grader. 
6. Cut the cake into bars while still warm and then let the bars cool completely and enjoy! // Skær kagen ud i barer imens den stadig er lun og lad dem dernæst køle helt af og nyd de lækre Chocolate Chip Cheesecake barer! 

Share:
Food + drinks•Sweet // Sødt

Makron Muffins

20/01/2017 by Jeanette Jewel No Comments
These Danish makron muffins always reminds me so much of my childhood – I remember so many times where students in my class had to bring cake to class and they often brought these amazing muffins. They’re very crispy on the outside but chewy on the inside – kind of like a macaroon! To make these “Makron muffins”, you need Danish makroner. I think they can be bought in some Scandinavian stores outside of Denmark! If you can get a hold of them, I definitely suggest you to make these muffins. They’re some of my favorite and very easy to make as well! 

Disse makron muffins minder mig altid helt vildt meget om min barndom – Jeg kan huske, at mange elever tit havde dem med i skole når de havde fødselsdag eller når der var kagedag. De er så sprøde udenpå, men dejligt chewy og bløde indeni. Den perfekte kombination! De er helt klart nogle af mine absolutte yndlings muffins og så er de oven i købet ret lette at lave. 

 
RECIPE/OPSKRIFT (15-18 muffins): 

– 250g crushed Danish makroner/knuste makroner
– 3 eggs/æg
– 100g melted margarine/smeltet margarine
– 220g sugar/sukker
– 1 tsp almond extract/tsk mandel essens
– 125g flour/mel
– 100g chopped dark chocolate/hakket mørk chokolade 

1. Whisk eggs and sugar until white and fluffy. // Pisk æg og sukker indtil det bliver hvidt og luftigt. 
2. Add everything else to the mix EXCEPT the flour and mix well. // Tilføj alle ingredienser, bortset fra mel, og pisk så godt. 
3. Add flour and whisk once again. // Tilføj mel og pisk så igen. 
4. Scoop batter into cupcake liners and bake at 200 degrees celcius for about 20-25 minutes. // Kom dej i en papirklædt muffinform og bag dine muffins på 200 grader i cirka 20-25 minutter. 
5. Let them cool and then serve! // Lad dem køle af og server dernæst! 

Share:
Food + drinks•Sweet // Sødt

Nougat Crunch Chocolates

18/01/2017 by Jeanette Jewel No Comments
These pretty little dark chocolate delights are filled with a lovely nougat crunch that goes perfectly well with the completely dark chocolate. It takes some time and practice to actually make filled chocolates, but when you’ve first tried it once – it’s pretty easy. However, it’s very time consuming.. but when those chocolates pop out of the molds? Worth it all! Here’s the recipe, if you ever want to try them out! 

Disse små fine fyldte chokolader med mørk chokolade og nougat crunch er så fantastiske. Det kræver noget øvelse og tid at lave disse, men når man først har prøvet det, så er det egentlig ret nemt. Det tager dog noget tid.. men når de fine små blanke chokolader hopper ud af formene er det da det hele værd! I får ihvertfald opskriften her, hvis I nogensinde vil prøve dem! 

RECIPE/OPSKRIFT: 
– 200g dark chocolate chips/Mørk chokolade, knapper
– 200g nougat
– 15g nuts/nødder

– 1 tbsp sugar/spsk sukker
– Gold cocoabutter (Buy it HERE)/Guldfarvet kakaosmør (Køb det HER)
– Praline Swirl chocolate mold (Buy it HERE)/Praline Swirl Chokoladeform (Køb den HER)
– Sugar thermometer/Sukkertermometer (Vi brugte denne spatula med indbygget termometer)
– Piping bag/Sprøjtepose

1. Make the filling. Put 1 tbsp sugar on a pan and caramelize the nuts. Let them cool and then chop them into small pieces. Melt the nougat over a water bath and mix the chopped nuts into it. Pour into piping bag and let cool at room temperature. // Lav fyldet. Put 1 spsk sukker på en pande og karameliser nødderne. Lad dem så køle af og hak dem i meget små stykker. Smelt så nougat over vandbad og bland de hakkede nødder i. Hæld det hele i en sprøjtepose og lad det køle i stuetemperatur. 
2. Melt two thirds of the chocolate chips in a water bath until it hits 48 degrees celcius. Pour the melted chocolate over the last third and when the chocolate hits 32 degrees celcius, it’s ready to use. // Smelt to tredjedele af chokoladeknapperne over vandbad indtil det rammer 48 grader. Hæld det dernæst over den sidste tredjedel, indtil det rammer 32 grader og er klar til at bruges. 
3. Splatter the melted gold cocoa butter into the mold and then fill the chocolate mold with dark chocolate and then turn it upside down to make sure there’s only a shell of chocolate left in the molds. Scrape the mold from excess chocolate. Let the chocolates cool in the fridge, upside down, for about 10 minutes. // Strint noget af det guldfarvede smeltede kakaosmør i formen og fyld dernæst formen med mørk chokolade og vend den på hovedet over en skål, for at sikre at alt overskydende chokolade kommer ud og der kun er en skal i formen. Skrab formen godt. Lad det dernæst køle i køleskabet i 10 minutter. 
4. Fill the chocolates with the nougat crunch. Put into fridge for another 10 minutes. // Kom nougat crunch fyldet i chokoladerne. Lad køle i 10 minutter i køleskab. 
5. Add the 32 degree celcius chocolate on the mold to close the chocolates (I use THIS chocolate melter to keep my chocolate tempered). Put in the freezer for about 10 minutes. // Kom tempereret chokolade på som bund (Jeg bruger DENNE chokoladesmelter til at holde min chokolade tempereret). Kom i fryseren i cirka 10 minutter. 
6. Pop your delicious little chocolates out of the mold and enjoy! // Så er dine chokolader klar til at komme ud af formen og nydes! 

Share:
Page 11 of 67« First...5«10111213»15...Last »

About me

Hi! My name is Jeanette and I'm a 30-year-old Danish Web- and SoMe assistant who loves cooking, baking, traveling, music, TV (and most other media-related stuff), fashion, friends & family - and then of course my little cute dog, Dean. Welcome to my universe!

Mickey Mouse vafler (Mickey Mouse waffles)

Mickey Mouse vafler (Mickey Mouse waffles)

20/02/2022
Dampede Bao boller (Steamed Bao buns)

Dampede Bao boller (Steamed Bao buns)

25/01/2022
Nem Snickers is (No churn Snickers ice cream)

Nem Snickers is (No churn Snickers ice cream)

21/01/2021
Luftige amerikanske pandekager (Fluffy pancakes)

Luftige amerikanske pandekager (Fluffy pancakes)

01/01/2021
Studenterbrød (Danish student bread)

Studenterbrød (Danish student bread)

24/07/2020

Instagram

2022 - Thanks for the memories 💖
.
Året der bød på blandt andet: Paris & Disneyland, Düsseldorf & Gaga koncert, Thailand, huskøb og masser af tid med dem jeg elsker allermest 🥰
(English below) En juletur i Den Gamle By med min (English below) En juletur i Den Gamle By med min søde mor 🥰❄️
.
A Christmas trip to Den Gamle By with my amazing mum 🥰❄️
Thailand recap 💙 . . #thailand #thailandtravel Thailand recap 💙
.
.
#thailand #thailandtravel #thailand🇹🇭 #visitthailand #bangkok #krabi #krabithailand #phiphiisland #thailand_ig #travelgram #travelblogger #travelling #travelasia #traveladdict
(English below) Elefanten har kæmpe betydning for (English below) Elefanten har kæmpe betydning for thaierne - De har haft stor betydning som arbejdsdyr, både i krig, som taxa for lokale og i junglen.. men også for turisme. Jeg selv har haft dårlig samvittighed siden jeg i 2016 betalte for at besøge elefanter trænet til at blive reddet på og lænket når der ikke var turister. Av. 
Denne gang besøgte vi et elefant “plejehjem”, hvis man kan kalde det dét! Alle 4 af de her smukke dyr lever i junglen med deres mahouter, som i øvrigt betegner dem som sine kæledyr. 🐘
De er reddet fra et liv som elefanter i cirkus eller som “taxa elefant” for turister. Nuvel, de ser stadig turister hver eneste dag - men de bliver fodret i massevis af bananer, får mudderbade og bliver badet i floden og virker generelt bare tilpasse! Det bedste er, at de ikke er lænket og mahouterne træner dem udelukkende ved hjælp af lyde (for elefanter ser ikke ret godt!) 
Kæmpe anbefaling at besøge sådan et sted 🥹
.
Elephants mean a lot to the thai people - They used them for centuries as working animals; In war, as a local taxi and even for tourists to ride on or for shows..
In 2016 I experienced this first hand when I paid to watch elephants in a show. Elephants that were chained up when they didn’t perform. I’ve felt bad about it ever since. 
This time we visited an Elephant sanctuary - A place where the elephants have been saved from the tourism and working industry. The mahouts live in the jungle with them and even consider them their pets! 🐘 
Yes, they do still get a lot of tourists visiting them - but they get fed lots of bananas, get mud baths and washed in the river and just generally seem very happy! Best part? No chains! The mahouts only train them by using sounds (seeing as elephants don’t have a great sight).
I really recommend visiting this place! 🥹
POV: Du står op og denne her morgenmad står klar POV: Du står op og denne her morgenmad står klar ude i poolen! 🥹🍉
.
POV: You wake up and this breakfast awaits you at the pool! 🥹🍉
.
.
#floatingbreakfast #breakfast #food #poolday #goodmorning #thailand #thailandtravel #aonang #aonangkrabi #visitthailand #aonangfood #ferie #morgenmad #pooltime #poolside @krabiresort
(English below) De første to dage i Krabi nærmer (English below) De første to dage i Krabi nærmer sig enden - Det er slutningen på regnsæsonen her, så helt blå himmel (uden skyer) har vi endnu ikke oplevet! 🌥️
Heldigvis er her stadig dejlig lunt - på trods af regn og skyer 😌 Vi krydser fingre for blå himmel og solskin når vi skal på ture i næste uge 🙈🤞🏻
.
First two days in Krabi are almost over - It’s the end of the monsoon season here, so we still haven’t experienced a clear blue sky 🌥️ However, it is still nice and hot, even when it rains 😌
Crossing our fingers for sun and blue skies when we go on some trips next week! 🙈🤞🏻
Load More... Follow on Instagram

Categories

Archives

© 2019 copyright // All rights reserved